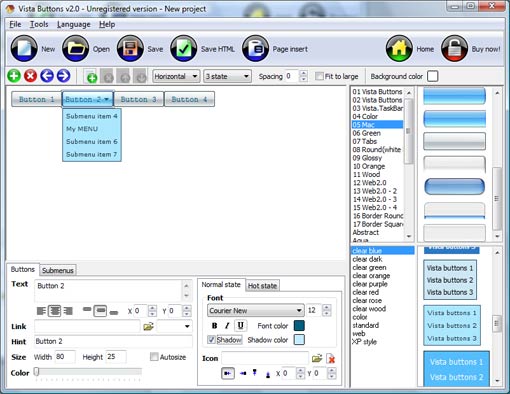
QUICK HELP
Click "Add button" and "Add submenu's item's buttons to create your menu. You can use ready to use Templates. To do it just select theme you like in the "Button themes" and "Submenu themes" list. Then you can browse this theme's button backgrounds. When you find a button background or submenu theme you like, double-click it to apply. Select vista button or submenu by clicking it and change button appearance for normal and mouse over states and set buttons/submenus link properties and link target attributes.Save your menu as project file, as HTML page or insert your menu into the existing HTML page
FLOATING WINDOW IN CSS
Let's assign text to the web menu buttons. Select first web button by clicking it and then enter text in the "Text" field on the Properties toolbox. You will see that, as you enter the text, the selected button's text will change too. 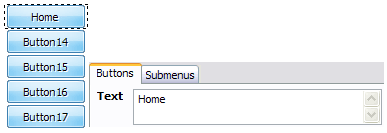
Then select next web button with click. Enter its text and so on. After finishing, the menu will look like this: 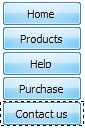
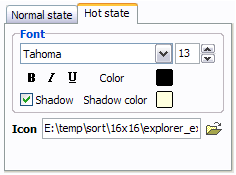
Now let's add some icons. Select button and then click the "Open icon" button on the "Normal state" tab of the Properties toolbox. 
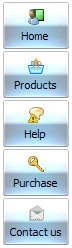
"Open" dialog will appear, where you can choose an icon. Other way to assign an icon is to type its full path and name in the "Icon" field ("c:\myicons\stylish_3\pretty.ico", for example). Repeat this for each menu button. You should get something like this in result: 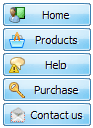
Let's change icons' position inside the buttons. To do it you should select all buttons by clicking on the first button, then pressing the Shift key, and then clicking the last web button while still holding the Shift key. You can also press "Ctrl + A" to select all buttons. Then click one of the "Icon Align" buttons on the "Normal State" tab on the Properties toolbox.

You will see that icons are aligned in the selected way now. In this example we choose Top icon align. 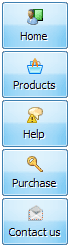
Now let's add text shadow to buttons when button in hot state. Select all buttons as described in the previous step and then set the "Shadow" checkbox on the "Hot state" tab of the Properties toolbox.
Now, when you point mouse at the menu button, shadow will appear under the button text like in the "Products" button of the following example: 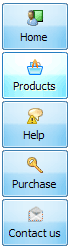
Let's change the menu theme. To do it just select theme you like in the themes list on the buttons editor toolbox. Then you can browse this theme's button backgrounds. Note, that button backgrounds are previewable. You can look at their behavior while choosing. Just point mouse at it, click it to know how web button will react.
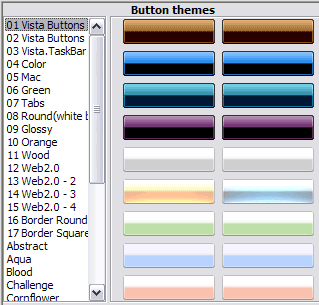
When you find a button background you like, double-click it to apply. For example, after choosing one of the "01 Vista Buttons" theme's backgrounds, we'll get following results:
DESCRIPTION
Create both horizontal and vertical menus and submenus with any amount of menus on one page. Design menus absolutely based on CSS (Cascading Style Sheets). It is possible to apply the personal CSS styles for every elements of the menu. When the submenu is bigger than the visible page area, the size of submenu will be automatically decreased. To view all the submenu you should use scrollbars
| Seamless Integration |
- Visible over flash, select boxes, iframes, java applets
- Multiple menus on the same page
- Amicable to other scripts and css styles
- Any HTML code can be used inside menu items
|
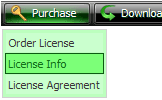
Como Hacer Menus Desplegables Horizontales Con Javascript | 3-state rollover buttons |
- Drop Down JavaScript Menu automatically generates images of buttons for normal, mouseover, and click states.
- There is also a feature of creation either static or 2-state buttons.
|
Css And Javascript Horizontal Menu| Css Style Popup Menu Design Floating Window In Css |
| Vista-style menus |
| Web menus, which are created by Java Script Drop Down Menu, exactly correspond with Windows Vista graphic interface components. That is why the visitors of your site will not have to spend their time in order to familiarize with the unusually-looking navigation. Nevertheless, you are not limited by the standard Windows themes, and you will be able to create your own original buttons. |