QUICK HELP
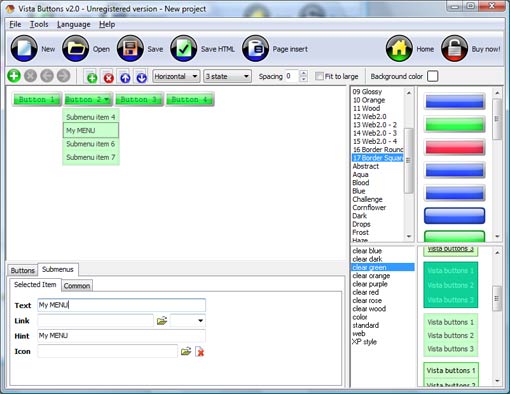
Create your menu using "Add button" and "Add submenu's item's buttons. Use various ready to use Templates. Double click on the Template to apply it. Change button appearance for normal and mouse over states and set buttons/submenus link properties and link target attributes. Save your menu as project file, as HTML page or insert your menu into the existing HTML page
CREATING TABS USING CSS
Click "Load image" and select the button image file you would like to add to the theme. It will be opened in the dialog.
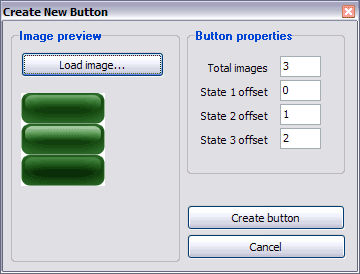
Here are three state images in the example, so set total images" field value to 3.
To define the button's hot state appearance, set the "State offset" fields to 0, 1, and 2. Then the topmost state image will be set for the Normal state, next image - for the Hot state, and the last state image - for the Pressed state.
Press "Create button" button. Created gif buttons will be added to the current theme and will be opened in the Theme editor.
DESCRIPTION
| Good navigation is an important step to website success. If people can't find their way around the site, they will quickly give up looking and leave, never to return. So, it's absolute vital that your website has a fast, neat, and eye-pleasing navigation.
Don't allow your website visitors to get lost. Try JavaScript DropDown Menu! | |
Compatibility        |
- Full cross-browser compatibility including IE, Netscape, Mozilla, Opera, Firefox, Konqueror and Safari on Windows, Mac OS and Linux
- Search engine friendly
- Support for any doctypes
|
Efectos Javascript Onmouseover | Vista-style menus |
| Web menus, which are created by JavaScript Drop Menu, exactly correspond with Windows Vista graphic interface components. That is why the visitors of your site will not have to spend their time in order to familiarize with the unusually-looking navigation. Nevertheless, you are not limited by the standard Windows themes, and you will be able to create your own original buttons. |
Collapsible Rows And Columns| Dhtml Hide Frame Creating Tabs Using Css |
| Professional Look-n-feel |
- Entirely customizable look-n-feel
- JavaScript DropDown Menu provides 500+ web buttons, 100 submenu designs, 50 ready-made samples
- Vista, XP, Win98, Mac, Aqua buttons, round, glossy, metallic, 3d styles, Web 2.0 style, tab menus, drop down menus will be a breeze!
- Create your own templates
|