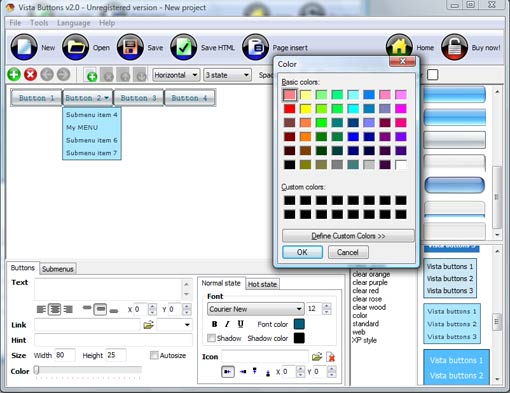
QUICK HELP
Click "Add button" and "Add submenu's item's buttons situated on the Vista Buttons Toolbar to create your menu. You can also use "Delete selected item", "Delete submenu's item" and move buttons. Create your own buttons or use ready to use Templates. Select vista button or submenu by clicking it and change button appearance for normal and mouse over states and set buttons/submenus link properties and link target attributes. Save your menu.
HTML ON MOUSE OVER
To create your own theme, you should create the button image states first. It contains button image for each Normal/Hot state of the button, one-by-one, vertically. Button image states is a .bmp file like this one. Each button image state must have the same height. In the example below the button states image has size 50x150. It contains three button state images, 50x50 each.

DESCRIPTION
Apply any font of any color, size and font decoration you need. Use any available type, color and thickness of a menu's frame. Choose any color for submenus and items backgrounds. Specify various values for spacing and padding for the whole menu and for each separate submenu. Create separators using your own pictures, size and alignment.
| Fully Customizable |
- Every button or menu parameter can be easily customized in Drop Down JS Menu to fit your web site design and your needs.
- Create your very own html menus, as simple or as complex as you want!
|
Drop Down Menu Howto | Extended capabilities to save and export the results |
- Everything you create with the program, has been saved in the Project File. This allows you either to continue your work at any time, or share your ideas with friends and colleagues.
- You can also save your menu as a HTML page, or export it as separate graphic images.
|
Css Drop Menu Simple Sample| Download Icons Windows Vista Html On Mouse Over |
| Not a string of code! |
- You will not need any skills in javascript and html with Drop Down JavaScript Menu. All programming will be completed for you.
- There even will be no necessity to edit your html code to insert a completed button-menu. Just point out the place on your page, where you want the buttons to be, and then press "Insert".
|
RELATED
onmouseover image change onmouseover image change
HTML onmouseover to change text? - Yahoo! Answers Best Answer: ok do this: <script type="text/javascript" language="JavaScript"> function changeText(pElem) { var text_1 = "your text 1 here"; var text_2 = "your text 2 here"; if(pElem
onMouseover JavaScript onMouseover=" "This is the form of the onMouseover command. The browser Main Page | HTML | JavaScript | Graphics | DHTML/Style Sheets | ASP/PHP
Javascript Change Link Text Color onmouseover <html> <head> <title>Javascript Change Hyperlink Text Color Onmouseover</title> <style type="text/css"> a { font-weight:bold;
HTML � HTML Core Attributes � onmouseover - DevGuru Quick The DevGuru HTML Quick Reference is the definitive HTML reference and tutorial resource on the web, with hundreds of ready to use examples for you to include in your
onmouseover image change onmouseover image change
Advanced JavaScript for Web Developers: onClick and JavaScript functions are very useful for web developers who wish to add interactivity to their websites. The OnMouseOver, OnLoad, and OnClick JavaScript functions are
how to create an onmouseover effect - HTML Help Central Site Building Central how to create an onmouseover effect Flash / Multimedia Join HTML Help Central. To sign up for your FREE account INSTANTLY fill out the form below!
onMouseOver Image Effect Tutorial Solution :) This is what your html should look like:
onMouseOver Image Effect Tutorial onMouseOver Image Effect Tutorial. Place your mouse over the image to see it change: This is the effect this tutorial is going to teach you how to create yourself :)
XHTML Attributes - onmouseover Explanation of the XHTML attribute onmouseover An event handler that specifies an action to take when the reader moves the pointing device over an element.
Image Effects : OnMouseOver Image Gallery / The JavaScript Source When the mouse moves over one of the thumbnails, the larger-sized picture area changes to the larger-sized picture that corresponds to that thumbnail. Easy to implement.
DevGuru HTML core attribute: onmouseover Award-winning web developers' resource: over 3000 pages of quick reference guides, tutorials, knowledge base articles, Ask DevGuru, useful products.
Advanced JavaScript for Web Developers: onClick and JavaScript functions are very useful for web developers who wish to add interactivity to their websites. The OnMouseOver, OnLoad, and OnClick JavaScript functions are
PAGE-2: OnMouseOver Button related to Button, Onmouseover PAGE-2: - HIGHLIGHTs: Button, Onmouseover, Mouseover, Image, Onhover, Buttonbrbra, Helpbbronmouseover, Amritonmouseover, Changebrcheersbramritbrbr, Pyostabrbrheybrthank
Image Rollovers | flipping images with JavaScript onMouseOver The Image Flip. Lets get into the swing of things with an example pass your mouse over the image below. This script is easy to configure, only requiring that you put
Image Effects : OnMouseOver Image Gallery / The JavaScript Source When the mouse moves over one of the thumbnails, the larger-sized picture area changes to the larger-sized picture that corresponds to that thumbnail. Easy to implement.
HTML onmouse over information and help Instructions and examples of how to do OnMouseOver in Javascript / HTML. Onmouseover. Quick links. Overview Examples Instructions. Overview. OnMouseOver is a new feature that
onmouseover changing mouse icon : icon, mouse, html, onmouseover I have a site in which i am printing rows dynamically through database using php.. but this question is about HTML the tag i have used outside the
XHTML Attributes - onmouseover Explanation of the XHTML attribute onmouseover An event handler that specifies an action to take when the reader moves the pointing device over an element.
onmouseover image change onmouseover image change
Image Rollovers | flipping images with JavaScript onMouseOver The Image Flip. Lets get into the swing of things with an example pass your mouse over the image below. This script is easy to configure, only requiring that you put
how to create an onmouseover effect - HTML Help Central Site Building Central how to create an onmouseover effect Flash / Multimedia Join HTML Help Central. To sign up for your FREE account INSTANTLY fill out the form below!
onmouseover Inline HTML < ELEMENT onmouseover = "handler" > All platforms: Event property: object. onmouseover = handler: JScript only: object. onmouseover = GetRef(" handler")
onMouseOver Image Effect Tutorial Solution :) This is what your html should look like:
HTML Rollover Images: Several On One Page - HTML Code Tutorial <A HREF="home_ro.html" onMouseOver = "rollover(' home ')" onMouseOut = "rollout(' home ')" ><IMG SRC="home.out.gif" NAME="home" HEIGHT=37 WIDTH=87
How to Create an Image Rollover Using HTML Programming | eHow.com Hypertext markup language (HTML) is a computer language that is used to create web pages. Type ONMOUSEOVER=rollover.src=? inside of the <A> tag. Replace
Change font color on mouse over [Archive] - WebDeveloper.com [Archive] Change font color on mouse over JavaScript Hey everyone --In my page I have the cell backgorund color change when the cell is moused over.
Advanced JavaScript for Web Developers: onClick and JavaScript functions are very useful for web developers who wish to add interactivity to their websites. The OnMouseOver, OnLoad, and OnClick JavaScript functions are
HTML � HTML Core Attributes � onmouseover - DevGuru Quick The DevGuru HTML Quick Reference is the definitive HTML reference and tutorial resource on the web, with hundreds of ready to use examples for you to include in your
onmouseover Event (A, ABBR, ACRONYM, ) Inline HTML < ELEMENT onmouseover = "handler" > All platforms: Event property: object. onmouseover = handler: JScript only: object. onmouseover = GetRef(" handler")
Dynamic Drive- Image Mouseover Effects Just insert a custom HTML attribute inside the image, and you're done. over any of the participating images, and a border is applied to it onMouseover.
Advanced JavaScript for Web Developers: onClick and JavaScript functions are very useful for web developers who wish to add interactivity to their websites. The OnMouseOver, OnLoad, and OnClick JavaScript functions are
CSS OnMouseOver - HTML / CSS answers CSS OnMouseOver. Ask HTML / CSS questions and get answers from our community of HTML / CSS experts and professionals on BYTES.
HTML Link Help - changing the status bar text onmouseover html link help - changing the status bar text onmouseover
OnMouseOver Button Open Discussion about OnMouseOver Button - HIGLIGHTS: Button, Onmouseover, Html, Text, Mouse, Input, Image, Code, Macromedia, Flash, Mouseover, Javascript, 0, View
onMouseOver Effects, hover using style sheet - CSS (HTML CSS tutorial to set the onMouseOver Effects in HTML. This is a free online tutorial.
onMouseover=(CSS Class)? : onmouseover, css any possibility of making a Mouseover within a tag styled by a CSS class? i.e., BLAH Any
OnMouseOver Button Open Discussion about OnMouseOver Button - HIGLIGHTS: Button, Onmouseover, Html, Text, Mouse, Input, Image, Code, Macromedia, Flash, Mouseover, Javascript, 0, View
Image Rollovers | flipping images with JavaScript onMouseOver The Image Flip. Lets get into the swing of things with an example pass your mouse over the image below. This script is easy to configure, only requiring that you put


