Bootstrap Tabs Plugin
Introduction
In certain cases it's quite handy if we can easily simply just set a few sections of info providing the exact same space on web page so the site visitor simply could surf throughout them without any really leaving behind the display. This gets conveniently obtained in the brand new fourth version of the Bootstrap framework using the
.nav.tab- *The best ways to work with the Bootstrap Tabs Border:
First of all for our tabbed control panel we'll need to have several tabs. In order to get one build an
<ul>.nav.nav-tabs<li>.nav-item.nav-link.activedata-toggle = “tab”href = “#MyPanel-ID”What is certainly brand-new within the Bootstrap 4 system are the
.nav-item.nav-link.active<li>Now once the Bootstrap Tabs Using system has been organized it's time for developing the panels keeping the actual content to get featured. Primarily we want a master wrapper
<div>.tab-content.tab-pane.fade.active.in.fade.tab-panelid = ”#MyPanel-ID”You can easily also make tabbed sections utilizing a button-- like visual appeal for the tabs themselves. These are additionally named as pills. To do it simply just make sure in place of
.nav-tabs.nav-pills.nav.nav-linkdata-toggle = “pill”data-toggle = “tab”Nav-tabs approaches
$().tab
$().tabSwitches on a tab feature and material container. Tab should have either a
data-targethref<ul class="nav nav-tabs" id="myTab" role="tablist">
<li class="nav-item">
<a class="nav-link active" data-toggle="tab" href="#home" role="tab" aria-controls="home">Home</a>
</li>
<li class="nav-item">
<a class="nav-link" data-toggle="tab" href="#profile" role="tab" aria-controls="profile">Profile</a>
</li>
<li class="nav-item">
<a class="nav-link" data-toggle="tab" href="#messages" role="tab" aria-controls="messages">Messages</a>
</li>
<li class="nav-item">
<a class="nav-link" data-toggle="tab" href="#settings" role="tab" aria-controls="settings">Settings</a>
</li>
</ul>
<div class="tab-content">
<div class="tab-pane active" id="home" role="tabpanel">...</div>
<div class="tab-pane" id="profile" role="tabpanel">...</div>
<div class="tab-pane" id="messages" role="tabpanel">...</div>
<div class="tab-pane" id="settings" role="tabpanel">...</div>
</div>
<script>
$(function ()
$('#myTab a:last').tab('show')
)
</script>.tab(‘show’)
.tab(‘show’)Selects the delivered tab and reveals its own connected pane. Some other tab which was previously chosen ends up being unselected and its connected pane is hidden. Returns to the caller before the tab pane has really been shown (i.e. just before the
shown.bs.tab$('#someTab').tab('show')Occasions
When showing a brand-new tab, the events fire in the following structure:
1.
hide.bs.tab2.
show.bs.tab3.
hidden.bs.tabhide.bs.tab4.
shown.bs.tabshow.bs.tabAssuming that no tab was already active, then the
hide.bs.tabhidden.bs.tab
$('a[data-toggle="tab"]').on('shown.bs.tab', function (e)
  e.target // newly activated tab
  e.relatedTarget // previous active tab
)
Final thoughts
Well fundamentally that is simply the method the tabbed panels get created using the newest Bootstrap 4 edition. A factor to pay attention for when creating them is that the various components wrapped within every tab control panel need to be more or less the identical size. This will certainly assist you stay clear of several "jumpy" behaviour of your web page when it has been actually scrolled to a certain position, the visitor has started browsing through the tabs and at a particular point gets to open a tab along with extensively additional web content then the one being simply seen right before it.
Examine a couple of on-line video guide relating to Bootstrap tabs:
Linked topics:
Bootstrap Nav-tabs: approved documentation

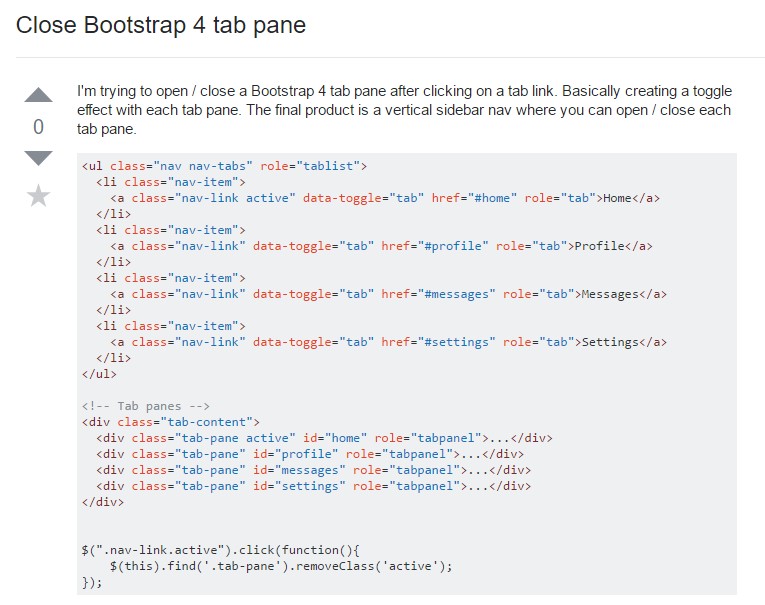
How to close up Bootstrap 4 tab pane
Bootstrap 4 Left Stacked Tabs
